The EzloPi smart IoT platform is an innovative solution designed to empower users to create and manage smart home and IoT (Internet of Things) projects with ease. It combines hardware, software, and cloud services to provide a comprehensive platform for building connected devices and automation systems.
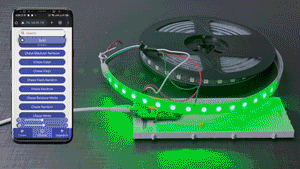
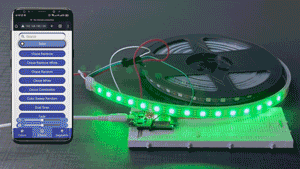
Welcome to the fast and exciting world of controlling addressable LEDs with your ESP32-based EzloPi device!
With the integration of the WS2812FX library with around 45 effects and over 60 palettes, opens up a world of dynamic lighting possibilities allowing you to create stunning combinations of lighting effects and displays.
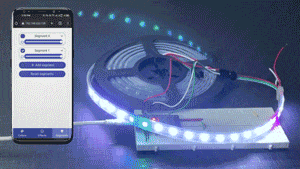
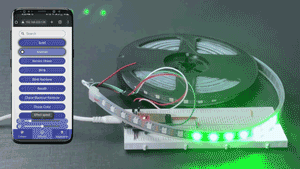
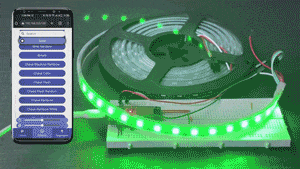
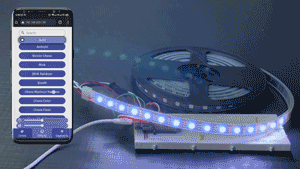
The modern UI provides simple and intuitive controls for color, effects, and segment configurations, allowing you to customize lighting to your preferences. Segments enable setting different effects and colors to various parts of the LEDs, enhancing versatility and ensuring seamless integration cycling through the addressable LED setup with the EzloPi smart IoT platform.
- Modern user interface.
- Controlled wirelessly without the need for physical switches/connections.
- Segments to set different effects and colors to parts of the LEDs.
- Support for RGB strips.
- Suitable for DIY projects.
- MiOS Web Application
- MiOS Smart Application for Android and iOS
- EzloPi device (ESP32-based controller board)
- Addressable LED strips (WS2812B, WS2811, SK6812, etc)
- Level shifter module (BSS138)
- 12V to 5V DC-DC Buck Converter (LM2596, etc)
- Power supply for the LED strip (5V/12V)
- Resistor (62 Ohms) (optional)
- Jumper wires
- Breadboard for prototyping (Optional)
- Ensure that stable output voltages (5V/12V) for both the ESP32 and LED are available.
- When using a level shifter, including a resistor is optional. Additionally, it's worth noting that some LED strips come with an onboard resistor, making its inclusion optional for effective voltage level conversion.
Connect your RGB LED(whether 5V or 12V) strip’s data pin (Din) to RX2 pin (GPIO16) on ESP32 board.
| Addressable LED strip | ESP32 |
|---|---|
| LED Data (Din) | RX2 (GPIO16) |
● Connections for 5V LEDs (such as WS2812B):
Following interconnections as shown below are made for interfacing the addressable LED to the EzloPi device:

● Connections for 12V LEDs (such as WS2811,WS2815 or SK6812):
For LEDs with a 12V power source, a step-down/buck converter is used for converting the 12V to 5V. Make sure that the step-down converter 5V output is stable otherwise try adjusting it using the potentiometer if available.

1. First setup your MiOS account by visiting https://www.ezlopi.com/set-up-mios-account and set up your device/hardware by visiting config.ezlopi.com.

2. Log in using the credentials which you just set earlier while signing up.

3. Under ezloPi on the top left corner, open the drop down menu.

4. Click on EzloPi Addressable LED.

5. Now, click on Connect Device and a pop-up window will appear.

6. Now, select COM Port to which your ESP32 device is connected. In our case, the COM3 port is used. Click Connect.

7. If you are new to this and it’s your first time configuring, select Create new Device ID. Enter Wifi SSID and Wifi password and then click on Flash Device.

8. A window will appear on the bottom left side of the screen displaying “Please press BOOT button while flashing begins.”

9. Hold the BOOT button down until the next window appears on the bottom left side of the screen which says “Installation prepared. Please release the boot button now.”

10. After some time, a popup will appear on the bottom right hand side of your screen saying Device Flashed Successfully!
This means that your EzloPi smart device has been set up successfully.
Before asking for help on other platforms, check the following top 5 most common mistakes while setting up the EzloPi Addressable LEDs. If you still have trouble and are going to ask for help, provide as much information as possible: describe your setup, take photos, and provide screenshots of your settings.
- LED strip is connected from the back side: Addressable LED strips have a direction indicated by small arrows on the strip. The data line must be connected from the side where the arrow begins.

- Wrong number of LEDs is set: The correct numbers of LEDs and the correct color sequence (RGB, BGR, etc.) or effect must be used. Effect should be set according to the number of LEDs connected. As seen below, we have applied the desired effect to 10 LEDs on the LED strip.

- Check effect by applying: To choose the desired LED effect, you can either apply the pre-defined effects or make a customized effect of your choosing using RGB colors.

- Wiring is bad: Wiring must be done thoroughly. Loose contacts and interconnections between different hardware components must be avoided. You also need to be careful about the correct sizing of the cables: too thin wires can not only cause high voltage drop but also lead to overheating and short circuit.
- If many power sources are used (for example separate one for ESP and separate one for the LED strip), then all their grounds (GND, V-) must be connected together (but do not connect their V+ together!).
EzloPi supports various types of LED Strip types which can be utilized to implement various interactive effects as per the user’s mood.
Addressable LED Strips allow control of individual LEDs separately. This enables you to use many effects. The supported types are listed below.
| Type | Voltage |
|---|---|
| SK6812 | 5V / 12V |
| WS2812B | 5V |
| UCS8903 | 12V |
| WS2811 | 12V |
| WS2815 | 12V |
| GS8208 | 12V |
| TM1814 | 12V |
Microcontrollers from Espressif, ESP32 (with dual core) with various ESP-32 based MCUs (such as Wemos D1, Arduino Nano ESP32, etc) are fully supported.
To try out EzloPi Addressable LEDs with 5V addressable strip, a simple microcontroller board like ESP32D1 mini is sufficient. The simplest setup should be like:

However, there are a few other things to keep in mind for a proper setup:
- A level shifter is required for reliable data transmission from the controller to the LED strip (this is mandatory, especially with 12V or 24V LED strips). Then you have to solder something together or you can buy a ready-made EzloPi controller right away.
- For safety reasons, the correct cabling (length, contacts) and the fuses or safety circuitry to be integrated must be considered. Especially with LED strips, it gets more complicated because you need the so-called intermediate feeds. These must be planned and implemented correctly.
- LED strips can get quite warm during operation and even overheat in the event of a fault. Again, for safety reasons, you have to protect the area around it: you shouldn't just lay LED strips like that, ideally you should integrate them into aluminum profiles or something similar. In normal operation, these act like a heat sink and thus extend the service life of the LEDs. In the event of a fault, they can protect the surroundings.
- To save energy while LEDs are off, you might integrate relays that switch the voltage of LEDs off completely.
Controllers Addressable LEDs can be installed to:
Input may be added by the hardware/embedded team.
Useful boards and addons

You can find many more exciting projects
| HC-SR501 | PIR sensor with adjustable sensitivity |
| DHT11 | Temperature and humidity sensor |
| MG966R | MG996R servo motor |
| FC-28 | Soil Moisture Sensor Module |
| TTP223B | Capacitive Touch Sensor module |
| DS18B20 | Digital temperature sensor |
| Display shield | Various configurations. Compatible with the ESP32 dev board also can be used with ESP32 mini dev boards. |
| MPU6050 | Gyro and Accelerometer module |
| 5V relay | Relay module |
| B366 motor | Mini DC motor |
Here are some sensors supported with the EzloPi device platform other than the Addressable LEDs. You can find more exciting projects on our website:
https://www.ezlopi.com/new-projects/
Versatile and feature rich smart home assistant application. Easy to configure with a user-friendly graphical interface.
To configure the Addressable LED strips according to desired colors and effects.
-
First setup your MiOS account by visiting https://www.ezlopi.com/set-up-mios-account and set up your device/hardware by visiting config.ezlopi.com.

-
Log in using the credentials which you just set earlier while signing up.

-
Under ezloPi on the top left corner, open the drop down menu.

-
Click on EzloPi Addressable LED.

-
Now, click on Connect Device and a pop-up window will appear.

-
Now, select COM Port to which your ESP32 device is connected. In our case, the COM3 port is used. Click Connect.

-
If you are new to this and it’s your first time configuring, select Create new Device ID. Enter Wifi SSID and Wifi password and then click on Flash Device.

-
A window will appear on the bottom left side of the screen displaying “Please press BOOT button while flashing begins.”

-
Hold the BOOT button down until the next window appears on the bottom left side of the screen which says “Installation prepared. Please release the boot button now.”

- After some time, a popup will appear on the bottom right hand side of your screen saying Device Flashed Successfully!
This means that your EzloPi smart device has been set up successfully.
New to the world of Electronics, Automation and IoT? Don't know yet how to make projects for your needs? Unsure how to connect your LEDs safely? How to connect your power supply?
No worries, we have collected a few helpful links for you to learn more about these and more topics while implementing them.


If you have any queries or questions and want to know more about Ezlo and the EzloPi platform, head over to our community forum.